1. Привязка карты к данным
В этой главе вы создадите:
-
Перечисление
LocationType. -
Сущность
Locationс атрибутом типаGeoPoint. -
CRUD-экраны с картой на экране
Location.detail.
Создание сущности Location и экранов
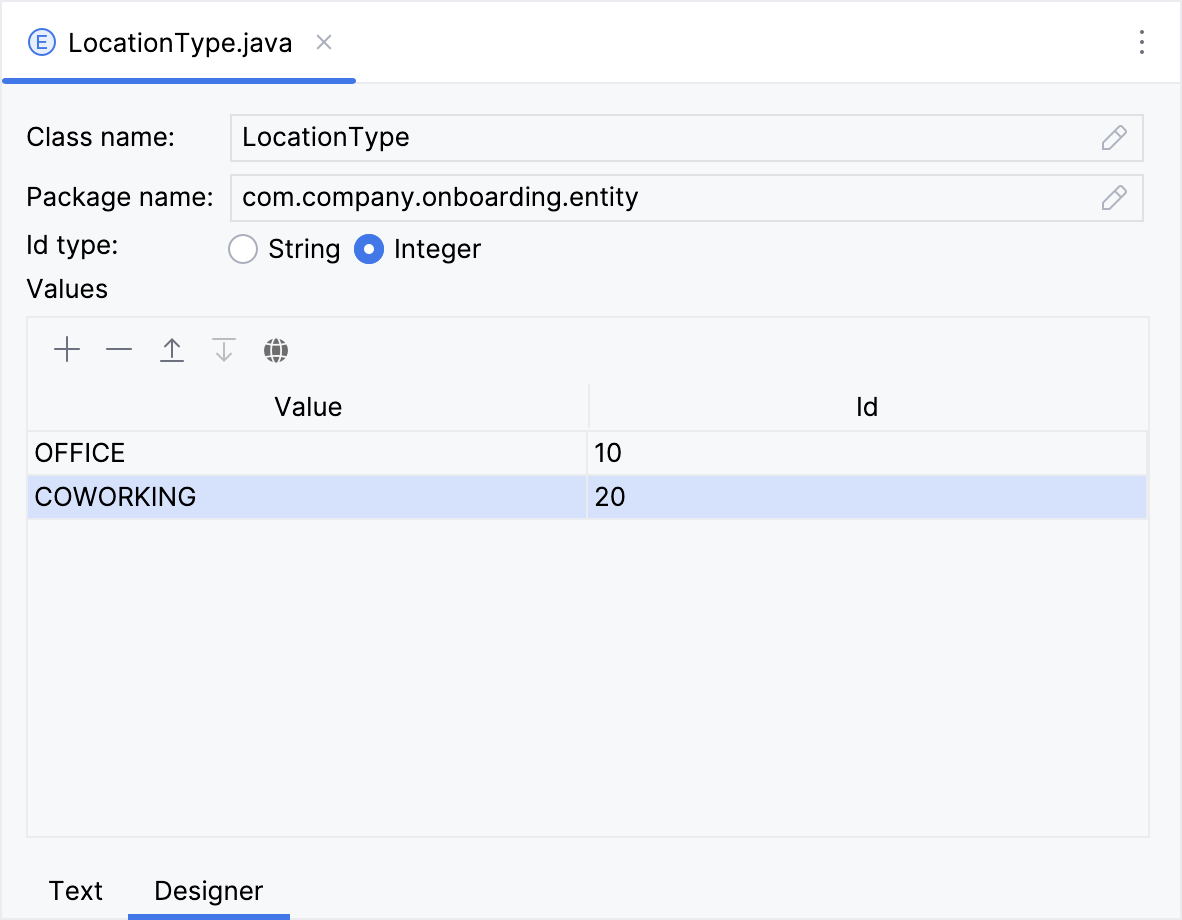
Для начала мы создадим перечисление LocationType, состоящее из двух значений: Office и Coworking. Подробные инструкции по созданию перечислений можно найти в разделе Использование перечислений Руководства.
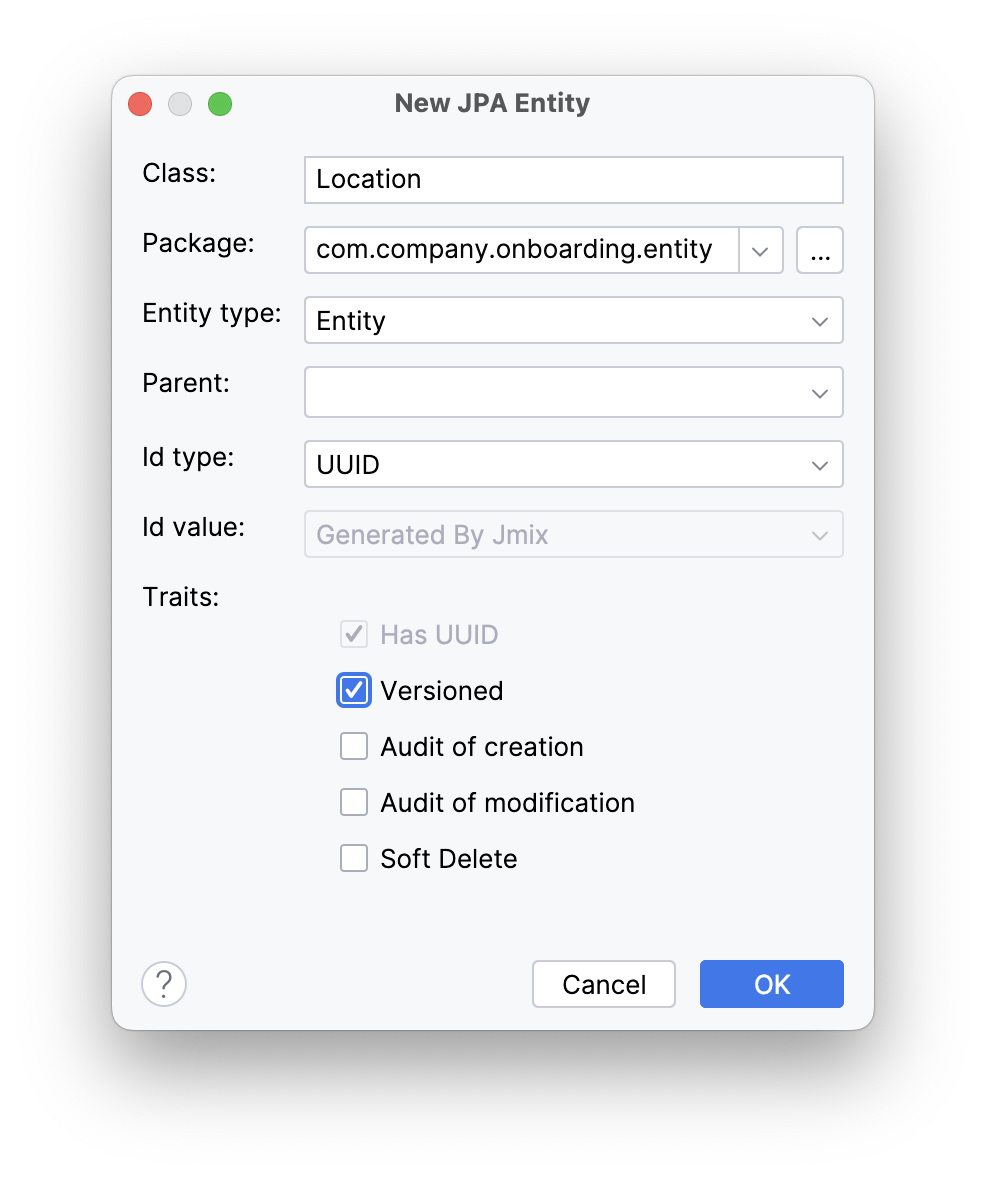
Затем создайте сущность Location. Подробные инструкции по созданию сущностей можно найти в разделе Простой CRUD Руководства.
Установите флажок Traits → Versioned в диалоговом окне New JPA Entity.
Сущность Location имеет следующие атрибуты:
-
cityтипаString. Установите флажок Mandatory. -
addressтипаString. Установите флажок Mandatory. -
typeтипа перечисленияLocationType. -
buildingтипаGeoPoint. Установите флажок Mandatory: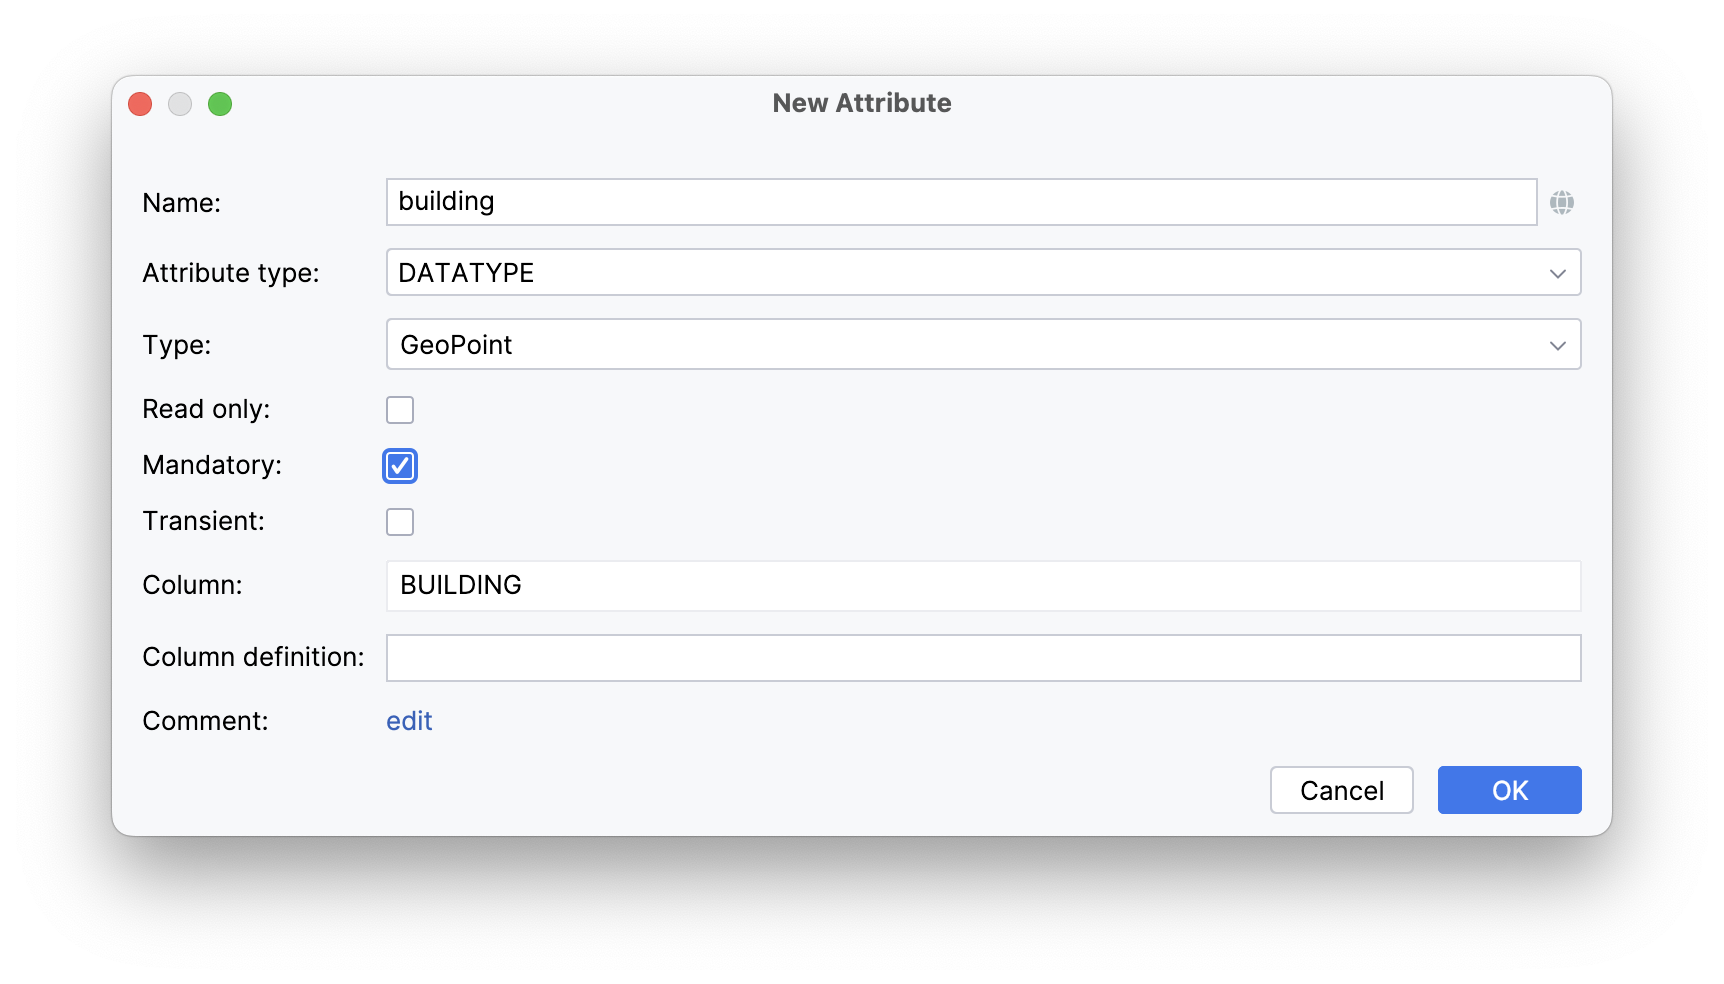
Определите атрибут address для генерации имени экземпляра.
Создайте CRUD-экраны для сущности Location. Подробные шаги по генерации экранов деталей и списка сущности можно найти в разделе Создание CRUD-экранов Руководства.
Следуйте предлагаемым значениям на каждом шаге мастера создания экранов.
Studio автоматически сгенерирует два экрана: Location.list и Location.detail, и откроет их соответствующий исходный код.
Добавление карты на экран
Найдите location-detail-view.xml в окне Jmix и дважды щелкните по нему. Появится конструктор экранов:

Вы заметите, что для отображения атрибута building используется компонент textField.
Если вы хотите отобразить карту на экране, вам следует добавить UI-компонент geoMap в XML-дескриптор.
Поместите курсор после элемента formLayout.
Затем нажмите Add Component на панели действий, найдите элемент GeoMap и дважды щелкните по нему.
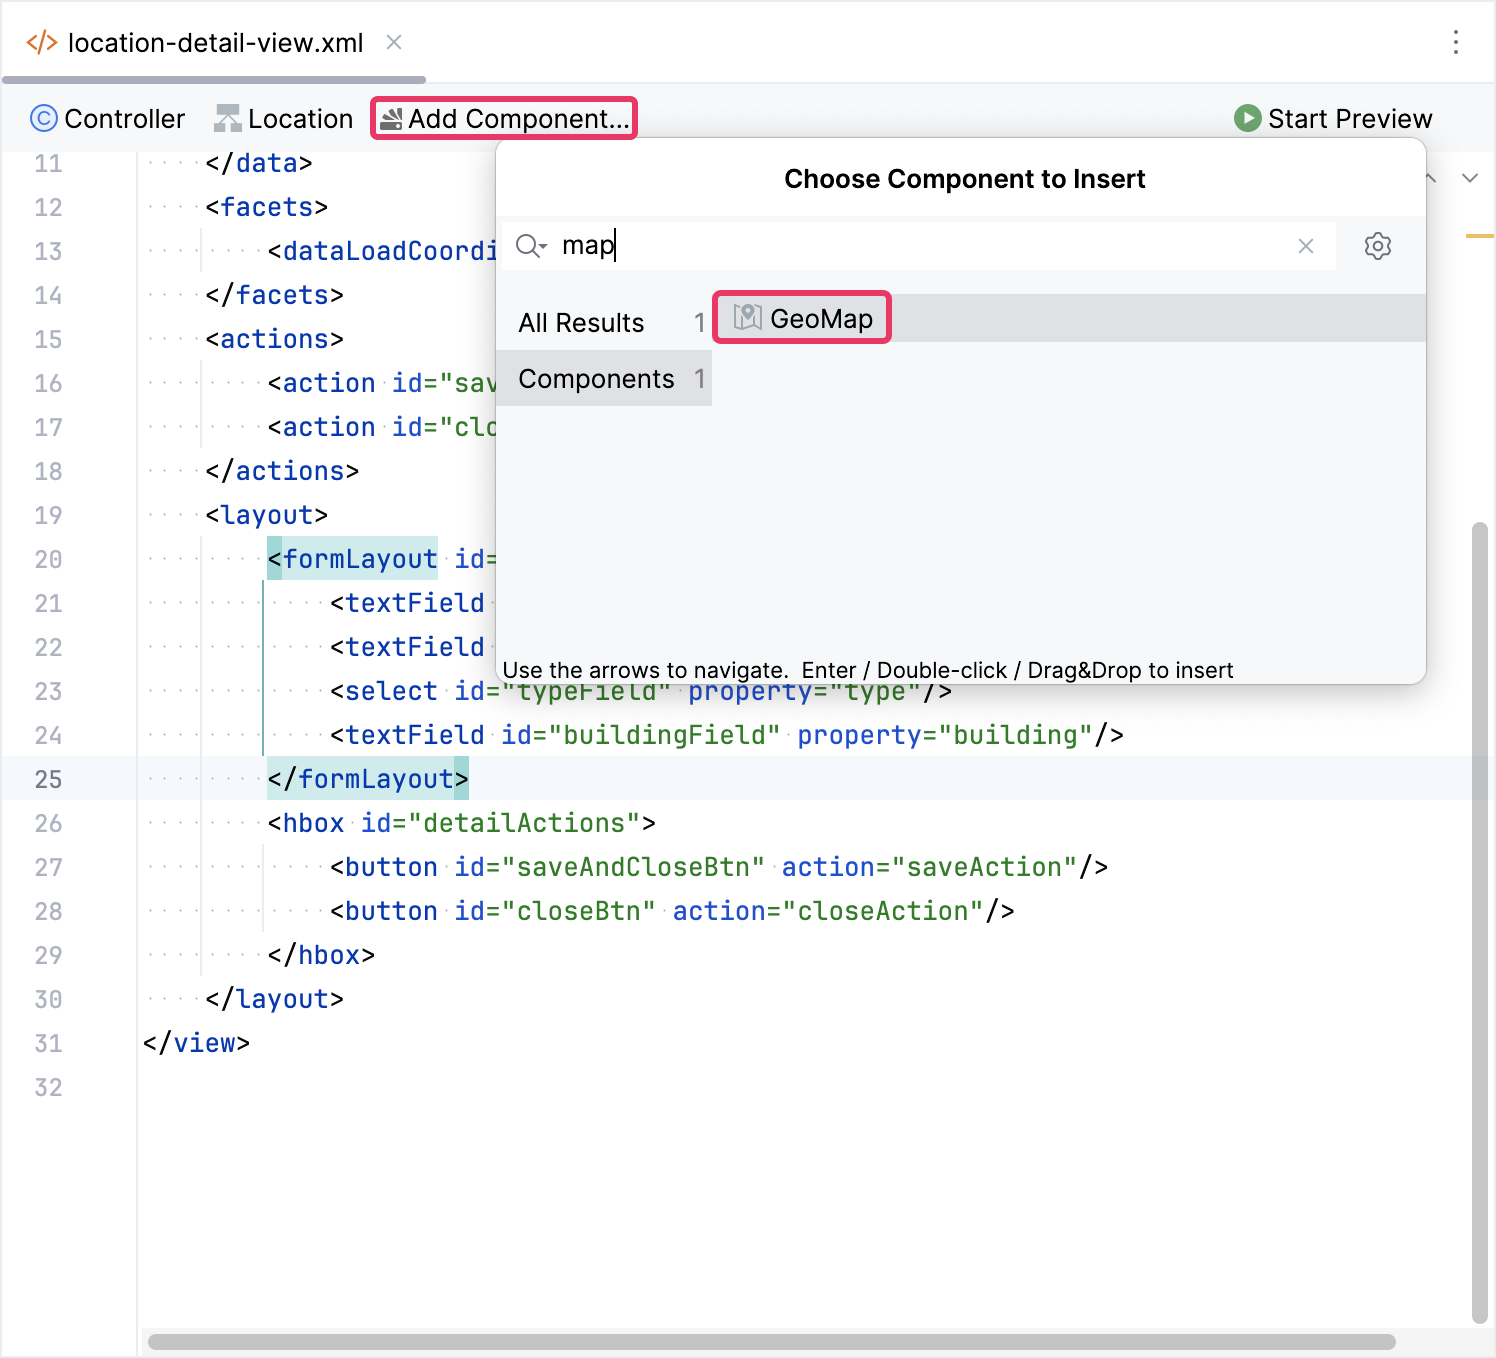
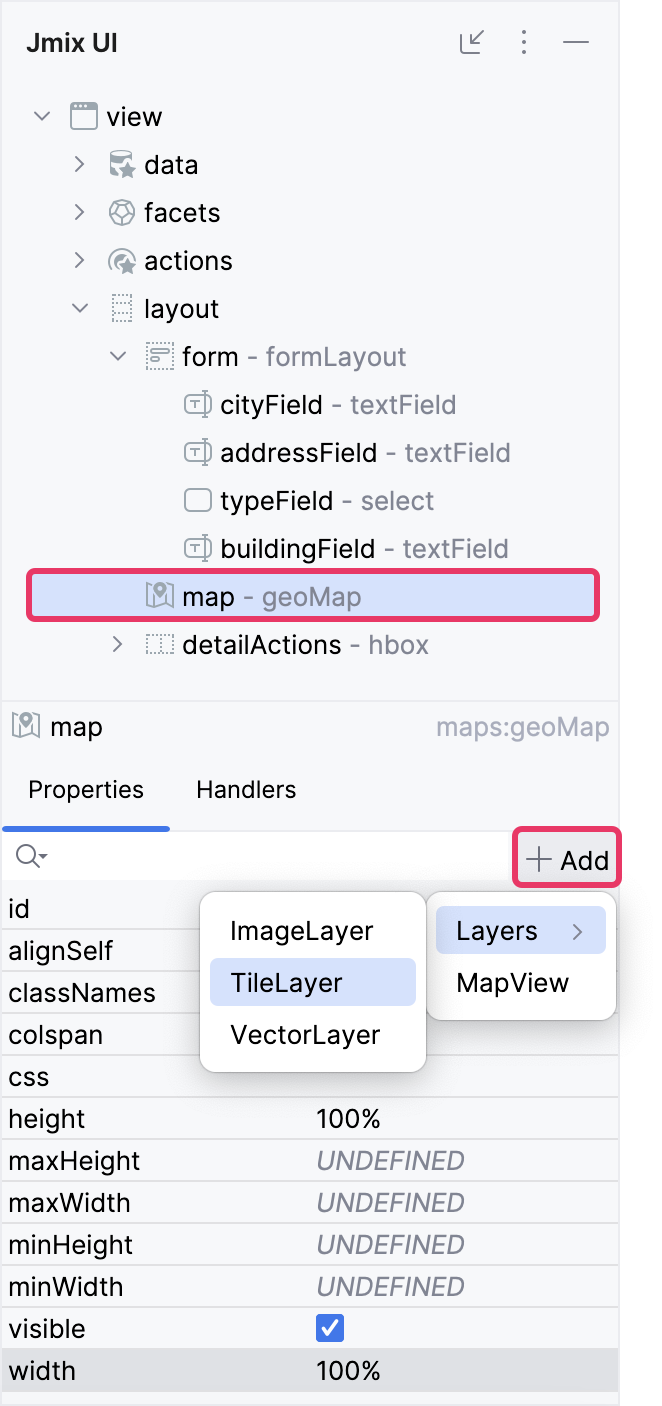
Новый элемент geoMap будет добавлен под элементом formLayout как на панели структуры Jmix UI, так и в XML. Настройте атрибуты id, height и width, как показано ниже.
<maps:geoMap id="map" height="100%" width="100%"/>Добавление тайлового слоя с OsmSource
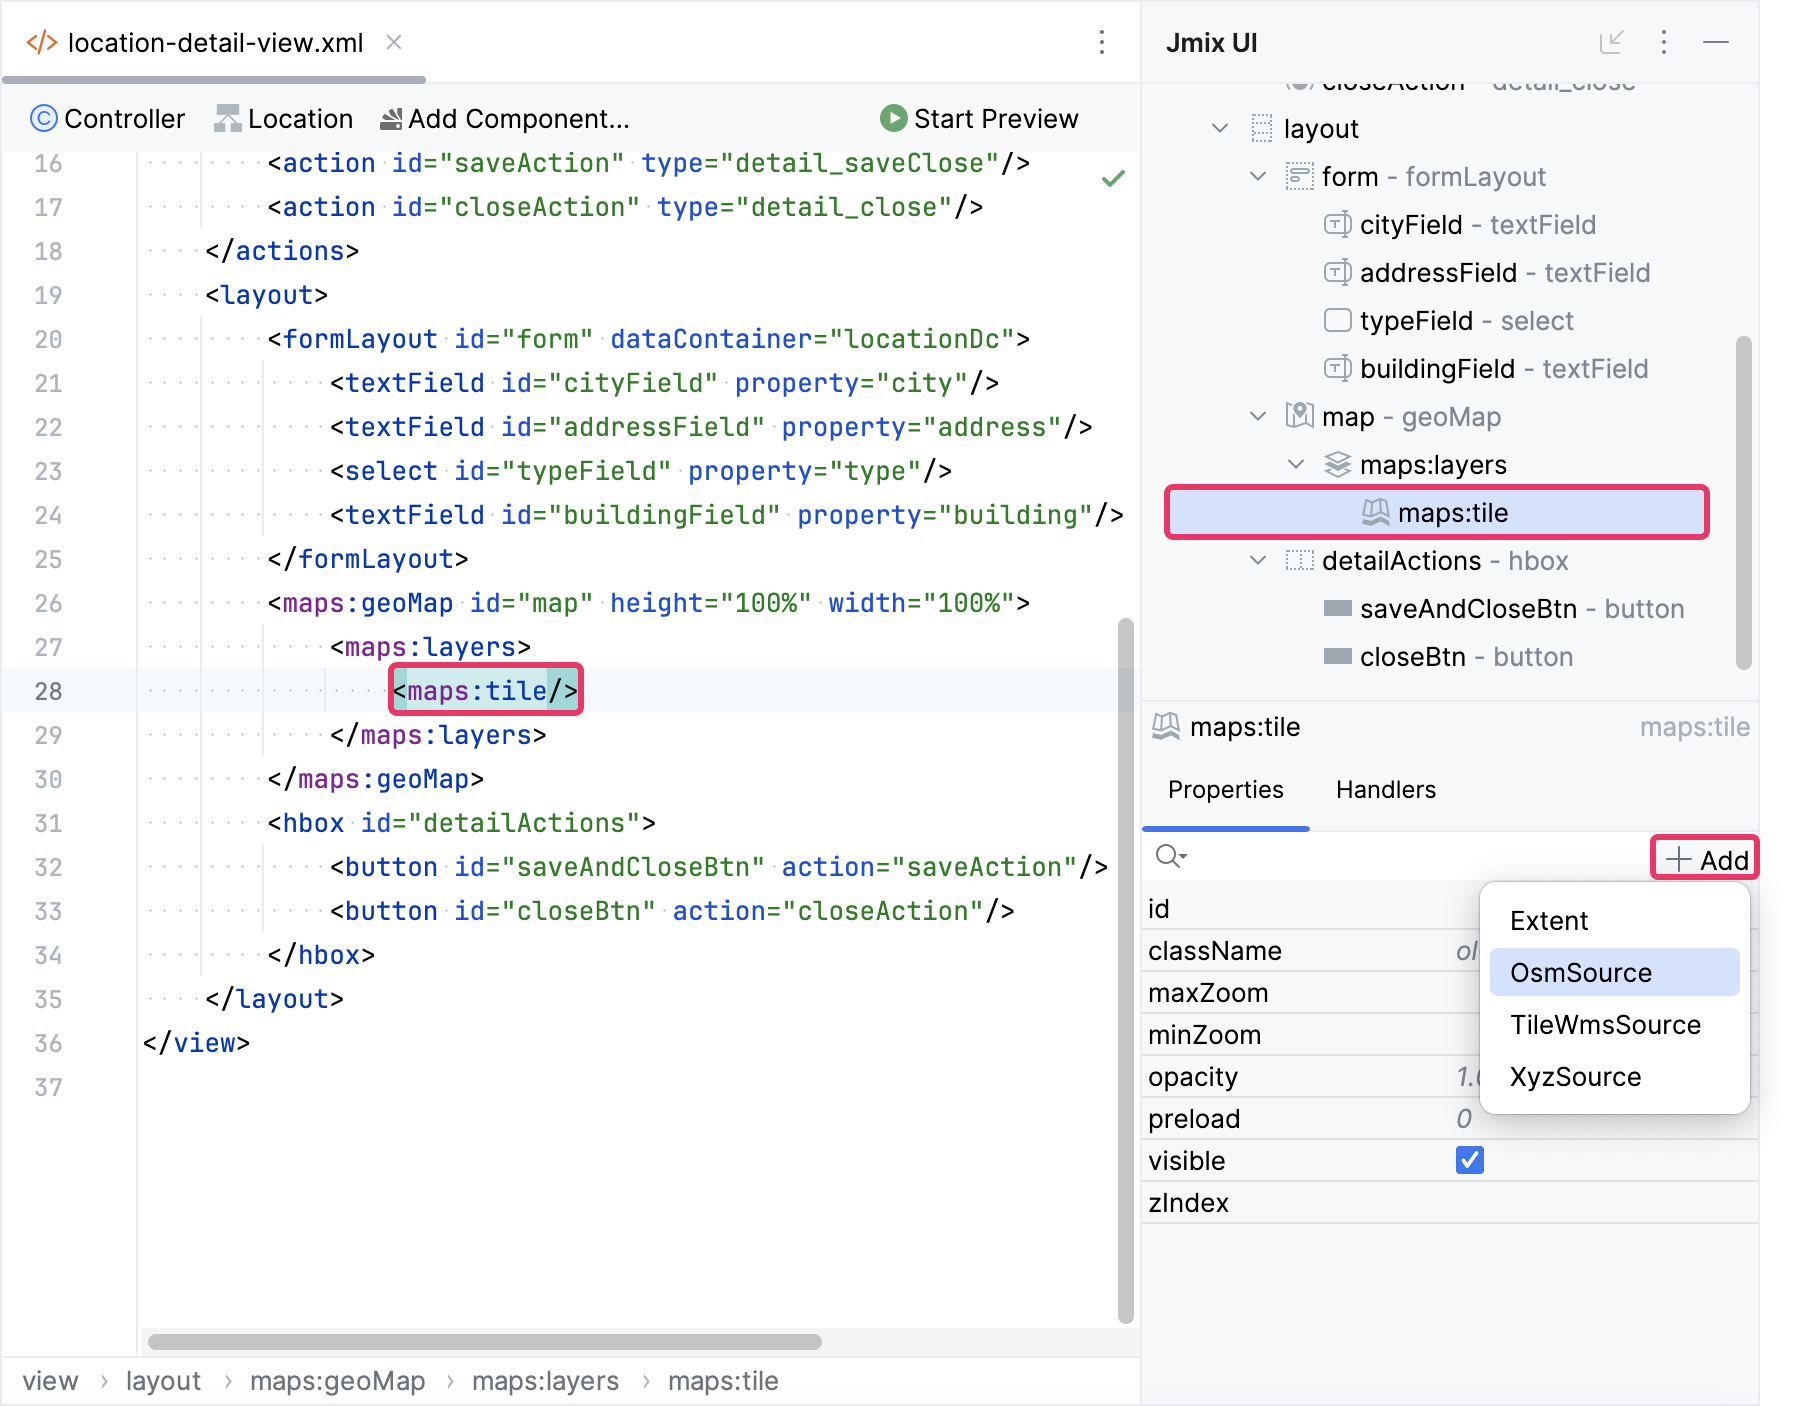
Мы собираемся использовать растровый слой в качестве базового фонового слоя карты. Для этого мы будем использовать OsmSource - предопределенный источник для отображения тайлов OpenStreetMap.
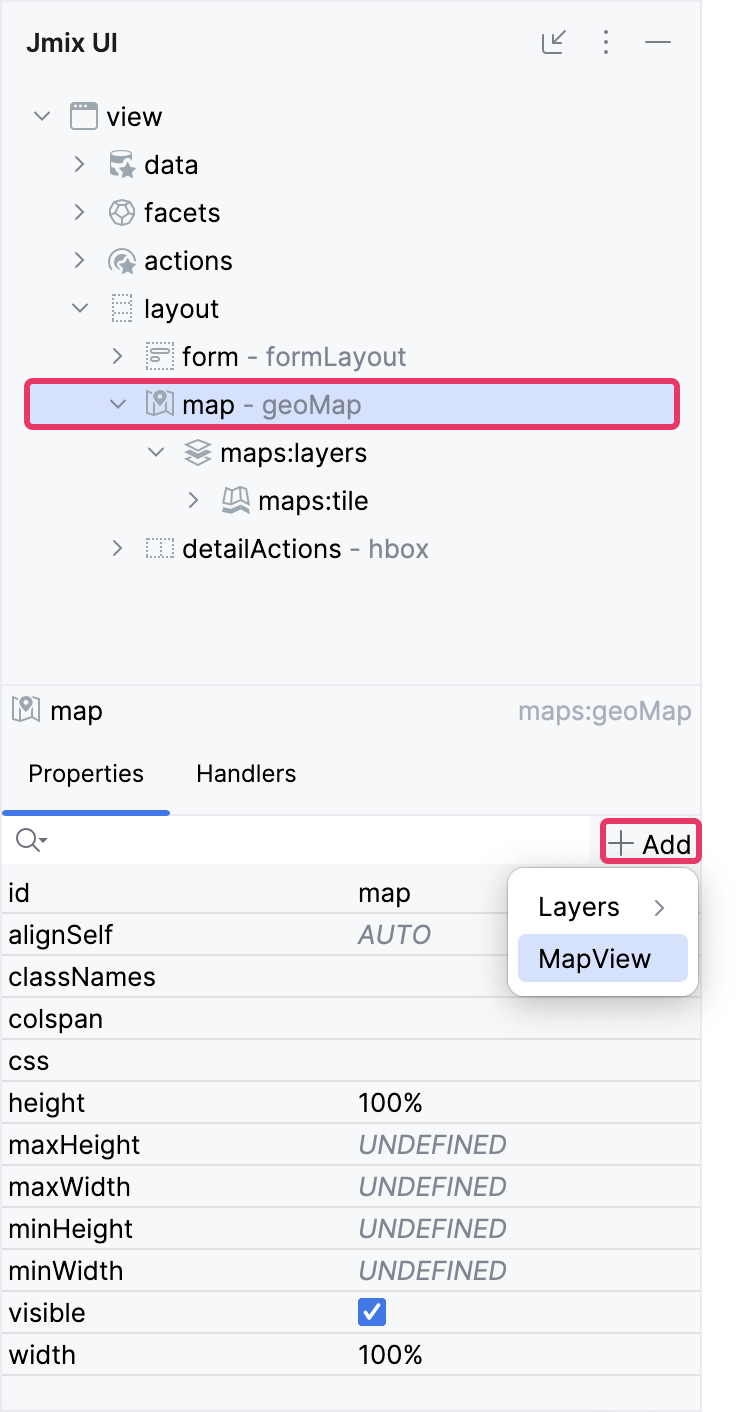
Выберите map на панели структуры Jmix UI или в XML-дескрипторе экрана, затем нажмите кнопку Add на панели инспектора. В выпадающем списке выберите Layers → TileLayer.
Выберите maps:tile на панели структуры Jmix UI или в XML-дескрипторе экрана, а затем нажмите кнопку Add на панели инспектора. В выпадающем списке выберите OsmSource.
Теперь давайте запустим приложение, чтобы увидеть новую функцию в действии.
Нажмите кнопку Debug ( ) на главной панели инструментов.
Перед запуском приложения Studio сравнивает модель данных проекта со схемой базы данных. Когда вы создали новую сущность, Studio автоматически сгенерировала changelog Liquibase для отражения соответствующих изменений в базе данных (таких как создание таблицы LOCATION):
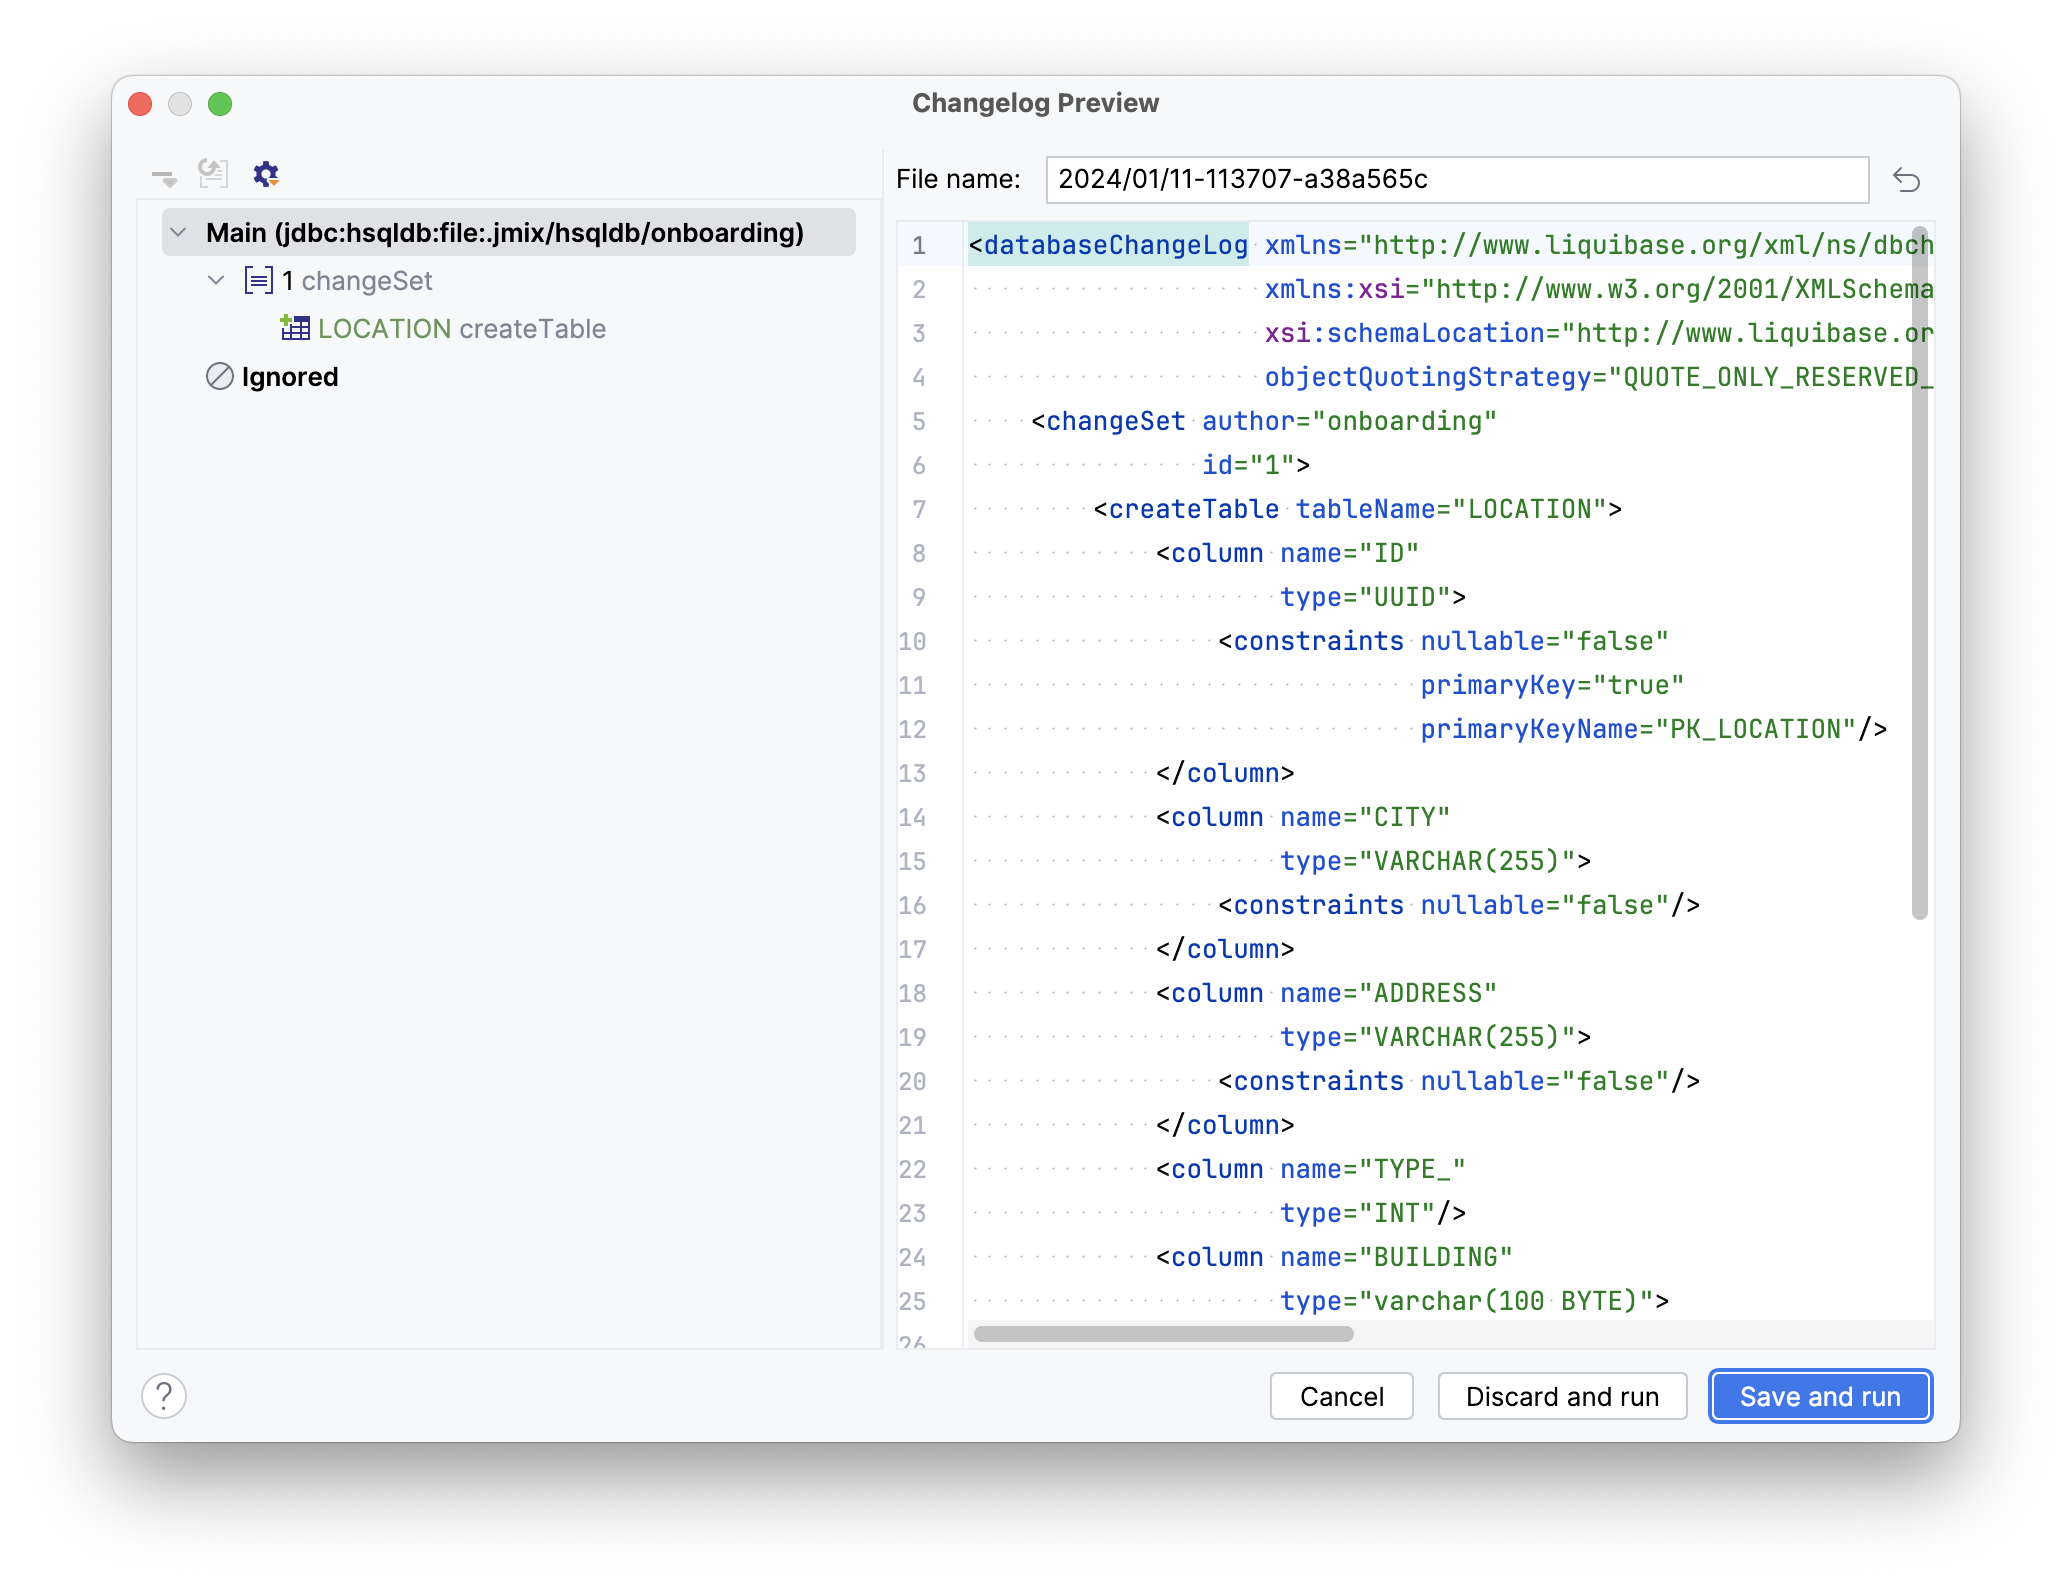
Нажмите Save and run.
Studio выполнит changelog в вашей базе данных, после чего соберет и запустит приложение:

После запуска приложения перейдите по адресу http://localhost:8080 в вашем веб-браузере и войдите в приложение с учетными данными admin/admin.
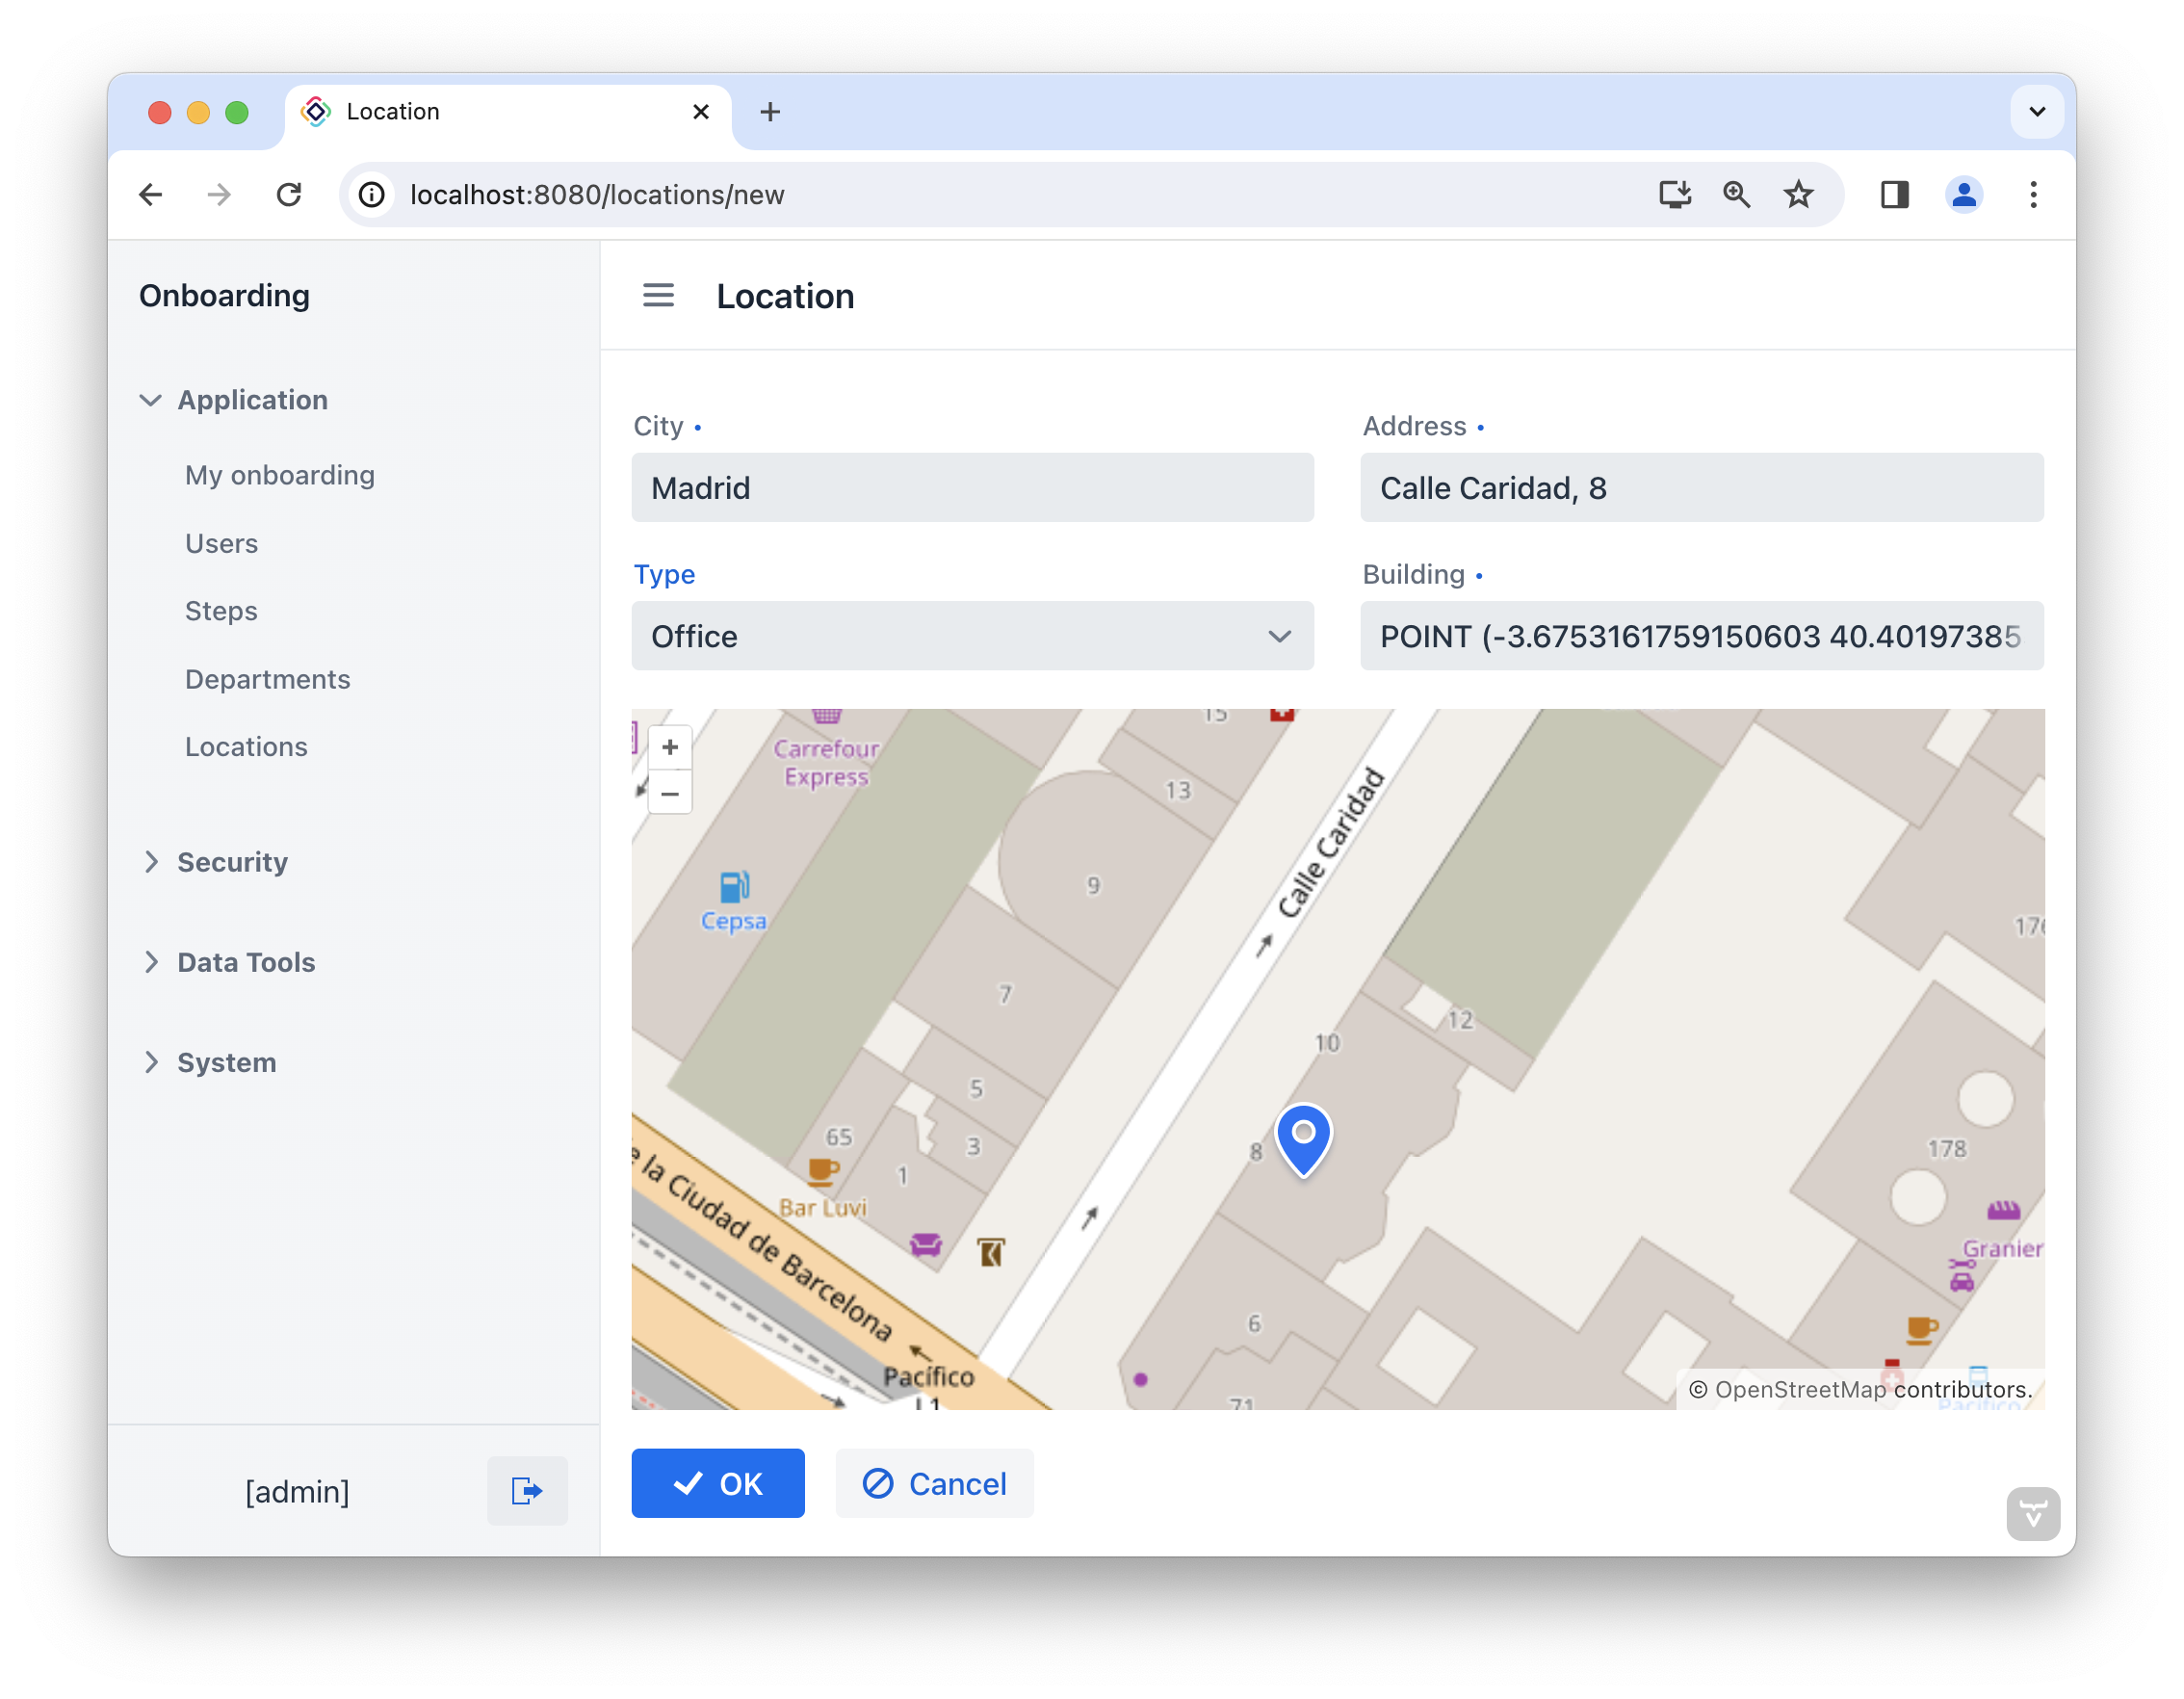
Выберите пункт Locations в меню Application. Вы увидите экран Location.list. Нажмите Create. Откроется экран Location.detail:
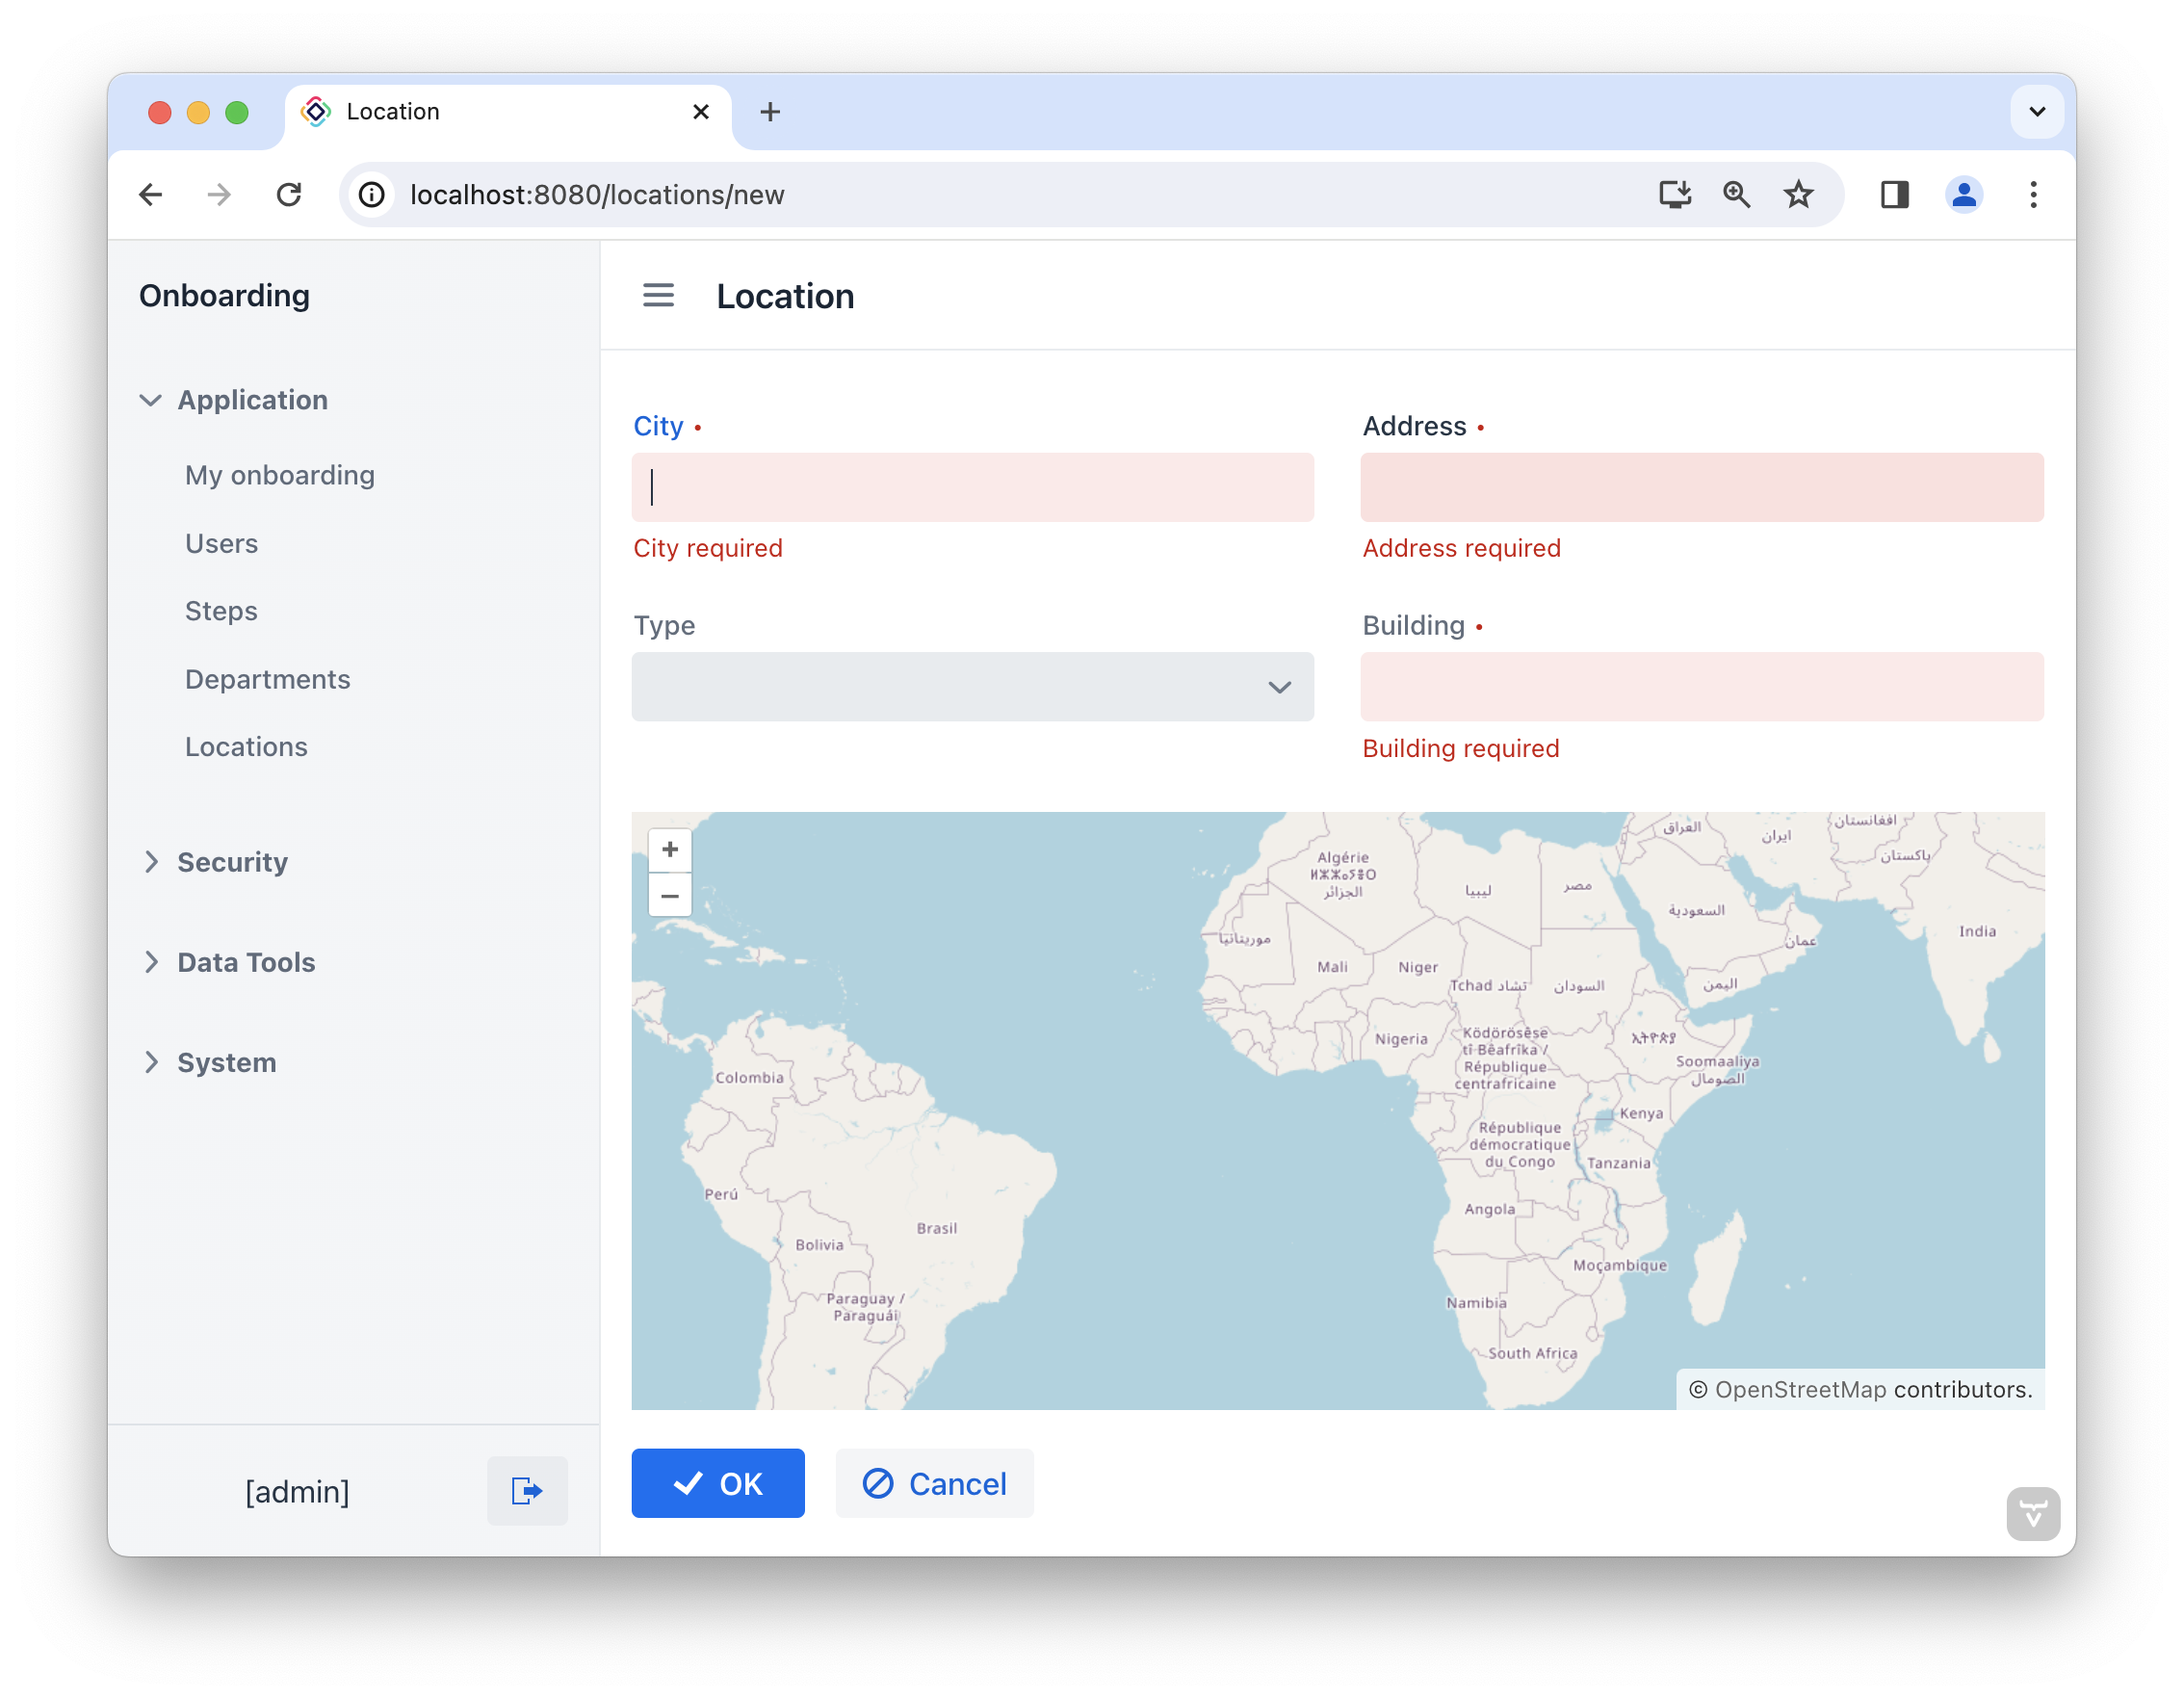
Настройка отображения карты
По умолчанию компонент geoMap отображает карту мира с начальным географическим центром в (0,0).
Мы используем отображение карты (map view) для настройки местоположения, отображаемого на карте.
Выберите map на панели структуры Jmix UI или в XML-дескрипторе экрана, а затем нажмите кнопку Add на панели инспектора. В выпадающем списке выберите MapView.
Укажите атрибут centerY:
<maps:mapView centerY="51.0"/>Выберите maps:mapView на панели структуры Jmix UI или в XML-дескрипторе экрана, а затем нажмите кнопку Add на панели инспектора. В выпадающем списке выберите Extent и настройте атрибуты minX, minY, maxX и maxY, как указано ниже.
<maps:extent minX="-15.0"
             minY="30.0"
             maxX="40.0"
             maxY="60.0"/>
Экстент (extent) ограничивает область просмотра, то есть ничего за пределами этого экстента не будет видно на карте.
Запустите приложение, чтобы увидеть новую функцию в действии.
Добавление векторного слоя с DataVectorSource
Для работы с геообъектами мы добавим векторный слой.
Перейдите к maps:layers на панели структуры Jmix UI или в XML-дескрипторе экрана и нажмите кнопку Add на панели инспектора. В выпадающем списке выберите VectorLayer. Укажите атрибут id следующим образом: id="vectorLayer".
Мы будем использовать DataVectorSource, который поддерживает привязку данных к контейнерам данных Jmix.
Выберите vectorLayer на панели структуры Jmix UI или в XML-дескрипторе экрана, а затем нажмите кнопку Add на панели инспектора. В выпадающем списке выберите DataVectorSource. Настройте для него атрибут dataContainer:
<maps:vector id="vectorLayer">
<maps:dataVectorSource id="dataVectorSource"
dataContainer="locationDc"
property="building"/>
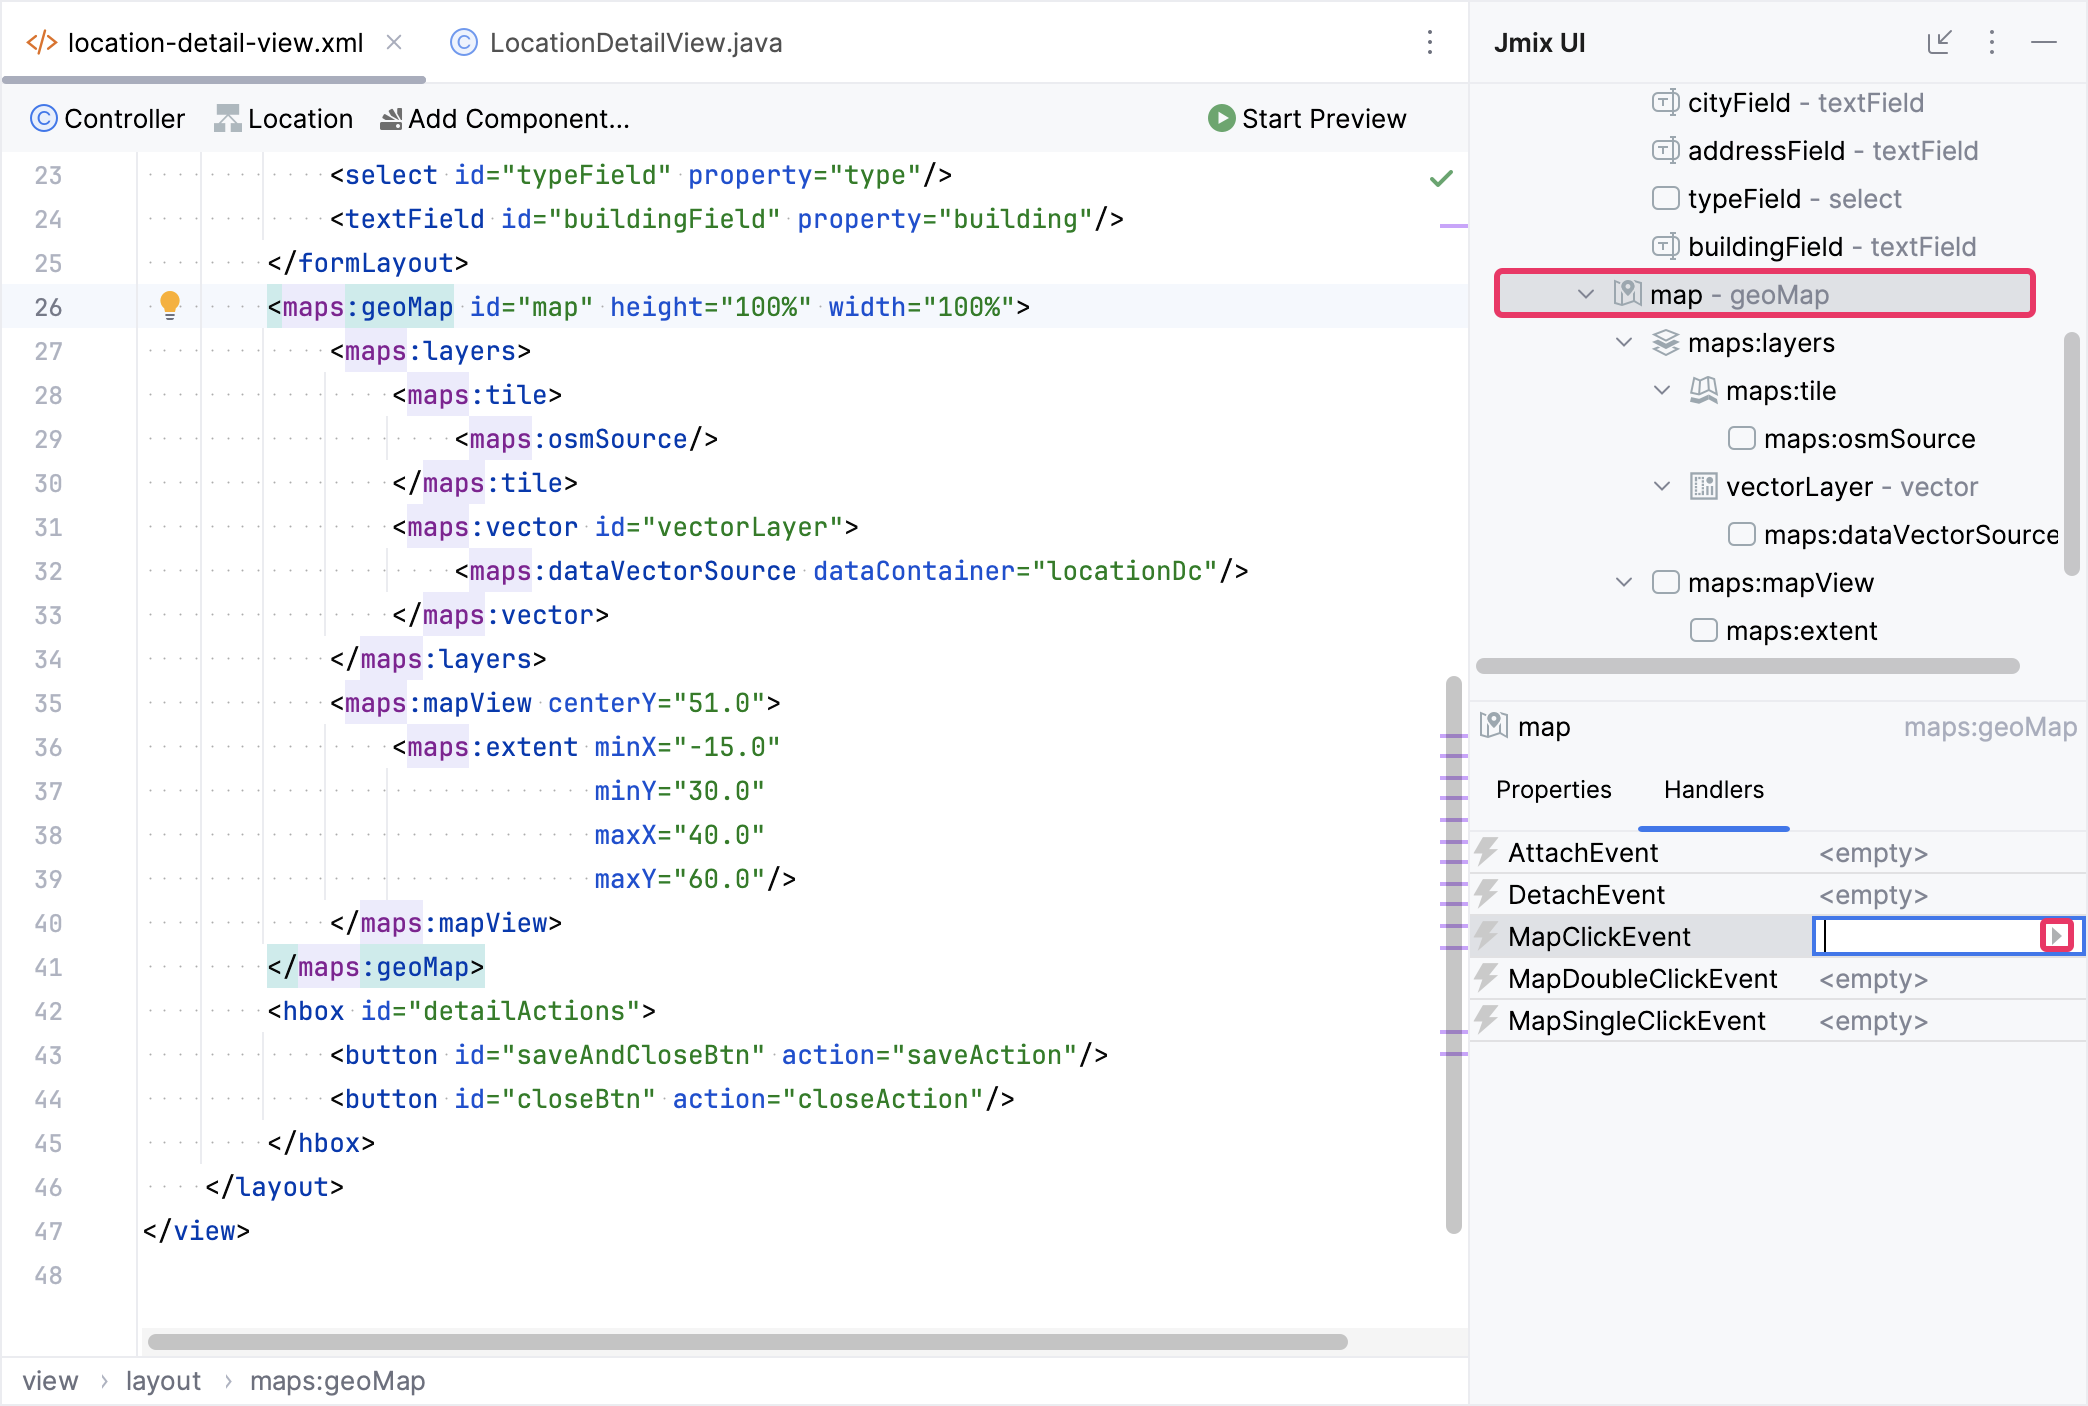
</maps:vector>Давайте посмотрим: полное описание нашей карты выглядит следующим образом:
<maps:geoMap id="map" height="100%" width="100%">
    <maps:layers>
        <maps:tile>
            <maps:osmSource/>
        </maps:tile>
        <maps:vector id="vectorLayer">
            <maps:dataVectorSource id="dataVectorSource"
                                   dataContainer="locationDc"
                                   property="building"/>
        </maps:vector>
    </maps:layers>
    <maps:mapView centerY="51.0">
        <maps:extent minX="-15.0"
                     minY="30.0"
                     maxX="40.0"
                     maxY="60.0"/>
    </maps:mapView>
</maps:geoMap>
Сохранение координат в атрибут Building
Когда менеджер по персоналу создает местоположение, он щелкает на точке на карте, которая затем сохраняется в сущности Location как Point с координатами.
Давайте добавим ClickEvent для нашей карты.
Выберите map на панели структуры Jmix UI или в XML-дескрипторе экрана, перейдите на вкладку Handlers и создайте метод-обработчик события MapClickEvent:
Добавьте логику получения и сохранения выбранных пользователем координат в метод-обработчик клика по карте:
public class LocationDetailView extends StandardDetailView<Location> {
    protected GeometryFactory geometryFactory = GeometryUtils.getGeometryFactory(); (1)

    @Subscribe("map")
    public void onMapMapClick(final MapClickEvent event) {
        Point point = geometryFactory.createPoint(event.getCoordinate()); (2)
        Location location = getEditedEntity(); (3)
        location.setBuilding(point);
    }
}| 1 | Для получения GeometryFactory используйте GeometryUtils - специализированный служебный класс с функциями, связанными с библиотекой JTS. |
| 2 | Преобразуйте координаты, полученные из event, в объект Point, используя метод GeometryFactory. |
| 3 | Используйте метод getEditedEntity() базового класса StandardDetailView для получения редактируемой сущности Location. |
Запустите приложение. Выберите пункт Locations в меню Application, чтобы перейти к экрану Location.list. Нажмите Create, чтобы открыть экран Location.detail. Заполните поля City, Address и Type соответствующей информацией. Щелкните на карте в указанном месте адреса. Значение для поля Building будет автоматически заполнено на основе координат выбранной точки на карте. Сохраните местоположение, нажав ОК.